Wednesday, September 3, 2014
NEW LOCATION!
After months of work {with an awesome team} we are finally moving locations! You can find us at our new {and improved} space in the blogosphere at five-times-fun.com …. please check it out and let us know what you think! And as always… WHY HAVE ANYTHING LESS THAN FIVE TIMES THE FUN?!
Tuesday, July 29, 2014
LillyGeneLetters on Etsy
For those of you love handcrafted things but just don't seem to have the patience or ability to create them I have a super easy fix! As back to school is rapidly approaching many of us college bound students are searching for a little pop of color to brighten our drab concrete dorm walls. I decided to brighten my walls by creating some decorative frames {post coming soon}, but if that isn't for you I have another great idea.
My friend Ms. Hannah Gene Martin has recently started up an Etsy account {under the name LillyGeneLetters} and she hand paints letters in Lilly Pulitzer inspired patterns!

With these super cute customizable letters you can mix and match these fun Lilly patterns for a fraction of the price! LillyGeneLetters sells each letter for $10.99 {plus shipping} and you can select your letter and the pattern you want {First Impression, Chiquita Bonita, Sunkissed}.

These letters are perfect for dorm rooms, nurseries or just wall decorations! Mix and match three of the letters to create a cute and colorful monogram display. The possibilities are endless on what you could do with these super fun and bright Lilly Pulitzer inspired letters.
Monday, July 21, 2014
DIY Sharpie Mug
After seeing several projects on Pinterest, I decided to try the sharpie method of customizing coffee mugs! I am using my mugs in my dorm room this fall {more posts about my dorm decor to come!} but you can make a simple dollar store mug into a great gift or party favor or just a cute present for yourself! Here is the super easy way to make your own DIY Sharpie Mug!

Things you'll need... a coffee mug, sharpies {any color works but they must be OIL BASED} and an oven set to 425F.

** Note: I have done quite a bit of research on these Sharpie Mugs and a lot of people suggest using DecoArt glass paint markers which are specific for this type of DIY, but if you don't mind hand washing sharpies work just as well and are a lot cheaper!**
If you are really good at free handing just simply, draw on the surface of your mug and bake it for 30 minutes at 425 degrees. Once the 30 minutes is up turn off your oven BUT leave the mugs inside to cool down {this will reduce the risk of cracking!}. Allow them to cool completely before washing or using.
If free handing is not your thing then here are some simple ways to make printable transfers without all the extra cost. Print out a pattern, letter, shape whatever you want and take a pencil and shade the back of it.

Tape your pattern, letter shape etc. to the mug and trace around the edges.


This is what your mug will look like with stencil transfer


Then take your Sharpies and go to town with the coloring in!


Pop them into the oven for 30 mins and let your creation finalize!


As you can see the colors changed quite a lot! The blue color changed to an olive green tone but the others stayed pretty similar. I did not know the colors would change as I was doing this DIY so I guess its a kind of guess and see what you get!
After completing my super cute mugs I decided to toss them into the dishwasher for a thorough cleaning... and thankfully the design held up! But just to be 100% on the safe side I would recommend hand washing your mugs!
Friday, July 11, 2014
Southwestern Quinoa and Black Bean Casserole
Here I go again with my love of all things Quinoaaaaa! This Mexican style dish is amazing and life changingly good! This casserole is flavor explosion of just the right amount of spice combined with crunch. It is perfect for attacking your friends and family with quinoa without them even knowing it. We all have those people in our lives who wont try the kin-o-wa since it is different and they already know they hate it {cough. Charlie Badger. cough}. The dish is loaded with Mexican flavors that make anyones mouth water just upon smelling it!
So enough with the description here is the delicious recipe...
So enough with the description here is the delicious recipe...
Southwestern Quiona and Black Bean Casserole
serves: 9
Ingredients
3 large cloves garlic, minced {low-key... I bought pre-minced cloves because I can.}
1 onion minced {now I wish onions came minced because I cried for a long time doing this}
2 jalepeños, seeds and ribs removed, minced {TOTALLY OPTIONAL.. mine does not have jalepeños in it because I'm a baby when it comes to spice}
1 tablespoon oil
4 1/2 cups cooked black beans, rinsed
1 1/4 cup vegetable broth
2 cups cooked quinoa
1/2 teaspoon cayenne pepper
1 teaspoon chili powder
1 teaspoon cumin
4 bell peppers, diced {I used red and yellowwww}
1 1/4 cup shredded Mexican cheese {really however much you would like}
Directions
1. Black Beans. Heat the oil in a large skillet over medium-high heat. Saute the garlic and onions {possibly jalepeños} for 4 minutes. Stir occasionally. Stir in broth and black beans and bring the mixture to a boil and cook for 5 minutes. The mixture should be thick, not watery. {if there is a lot of water let the mixture cook out on low heat for another few minutes}

2. Quinoa. In a dry skillet over medium-high heat, toss and toast the cooked quinoa with the cayenne, chili powder and cumin. 1-2 minutes.

3. Peppers. In the same dry skillet over medium-high heat, place the diced peppers and do NOT stir. {not stiring allows the peppers to get a brown roasted look on the outside} Don't over cook the peppers because they will, at the end, become soggy if over cooked.

4. Assemble. Preheat the oven to 375F degrees. Spoon black bean mixture into a baking dish. Top with Quinoa, Bell Peppers and Cheese. Cover with foil and bake for 20 mins. Remove the foil and bake for an additional 10 mins, or until the top layer of cheese is golden and bubbly.
5. Serve with sour cream, tortilla chips, on tacos, salad or as a side!

ENJOY
Thursday, July 10, 2014
Steppin' Up in the World
We are now on Bloglovin' thanks to a friend who gave us some insight into the blogosphere! By creating an account on Bloglovin you can follow all of your favorite blogs with ease {follow us, follow us!}
"http://www.bloglovin.com/blog/12523477/?claim=b28de5e6qwh"
Follow my blog with Bloglovin
"http://www.bloglovin.com/blog/12523477/?claim=b28de5e6qwh"
Follow my blog with Bloglovin
Tuesday, July 8, 2014
Pocket Tees
Hey Hey there readers. If you follow us on instagram {@fivetimesfun} I hope that you will have noticed a few of our posts about Pocket Tees. Well we think we have left you in suspense for quite enough time now. Without further adieu we would like to introduce you to....
Five Times Fun's Pocket Tees. Now For Sale!
We have discussed fabric, t-shirts, sizes, every little detail possible to have come up with these perfect pocket tees created and customized just for you! So here is Charlie being the best boyfriend ever and modeling some of our tanks and tees for you!


Tanks - $10.00


Short Sleeves -$12.00

Long Sleeves - $15.00
Please let us know if you are interested in purchasing a Pocket Tee by emailing Taylor5921@aol.com or commenting below. We can not wait to create Pocket Tees just for you :)
Cotton Anniversary
June 30th just seems like any other day to most people, but to Charlie and I {and in a strange coincidence, my parents} it is our anniversary! It is crazzzyyy that we have been dating for two years now. What?? I guess time really does fly when you're having fun! In anticipation of our anniversary coming up I have been racking my brain thinking and searching for cute gift ideas for Charlie. And after many days of planning and thinking I finally came up with the perfect present for himmmm :)
COTTON!
Now I'm sure many of you are wondering... hmmm, what the heck is cotton? Well before you jump site and start thinking I'm crazy, just wait, hold up and let me explain myself.
As I'm sure many of you are aware, anniversaries usually have a traditional anniversary gift that goes along with the year.

and if you look at 2nd anniversary you will see that cotton is the traditional gift. So there is my hidden logic behind this strange gift idea.
What I decided to do with this cotton was to give Charlie a present for each letter, sort of like an acronym.

C is for Comfy Boxers.
Tommy Hilfigure
O is for One Pack of Socks
Polo Ralph Lauren
T is for Tickets to an FSU Football Game.
T is for T-shirt.
Vineyard Vines.
O is for One and Only.
N is for Next Year's Adventures.
:) I hope this helped you think of anniversary present ideas for yourself and a loved one! I thought this was super cute and a fun way to celebrate with Charlie.
Tuesday, July 1, 2014
4th of July: Fun
As July 4th is rapidly approaching us Five Times the Funners decided to give y'all a little taste of everything! We will show you some great foods to serve at your 4th of July party, red white and blue themed clothing for the festivities, and some awesome crafts to make all this come together perfectly! So lets goooooo:

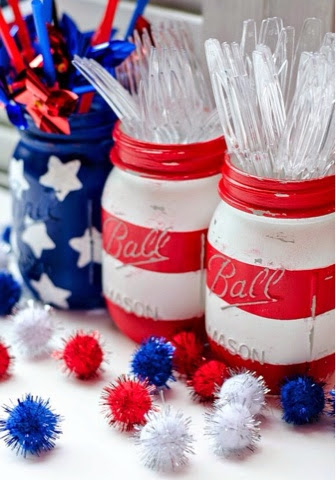 patriotic themed mason jars

 cornhole is a great game to play at a barbecue or the beach! If you're having people over to celebrate, pull out the cornhole set and to make it more 4th themed, make or buy american flag bean bags or paint the cornhole board!

Fun
wether your fun is crafting or playing we've got ideas for both!
For those of you with munchkins who are looking for a craft/activity for the day here is an idea from JugglingWithKids. Take pipe cleaners and twist them, then unfold the ends to make a firework type shape. dip the pipecleaners into paint, dab onto paper, apply glitter and Tadaaaaa! you have some super cool fire work paintings made by your very own kiddos:)
Monday, June 30, 2014
4th of July: Food
As July 4th is rapidly approaching us Five Times the Funners decided to give y'all a little taste of everything! We will show you some great foods to serve at your 4th of July party, red white and blue themed clothing for the festivities, and some awesome crafts to make all this come together perfectly! So lets goooooo:
Food
Here are some super easy quick ways to give your 4th of July BBQ or party the little red, white and blue spirit it needs!

This first treat is an adaption of our previous post "Pretzel Buttons". For those of you who haven't seen that post we attached a link to it and we will also show you quickly{and very briefly} what to do :)
When you are at the store shopping for ingredients be sure to pick up 4th of July themed M&Ms and Hershey Hugs! The more themed the betterrrrrrr :) Do the recipe just like normal. Preheat the oven 200F. Line a cookie sheet with pretzels. Place the Hershey Hugs onto the pretzels. Bake 4-5 mins then remove from the oven. Take your M&Ms and smush them down onto the pretzels. Place the Pretzel Buttons into the freezer to cool. Tada yummy little treats!

The second treat is chocolate covered strawberries. Who doesn't love some sweet strawberries with chocolately goodness? Take your strawberries and wash and clean them. Melt your chocolate in a microwave safe bowl and use the "chocolate" setting on your microwave {if you don't have that setting just watch the chocolate so it doesn't burn} Hold the strawberries by their stems and dip them into the chocolate. Now here is where you can get creative. Either dip your still warm chocolate strawberries in blue sprinkles or you can let the chocolate cool and then apply zigzags and stripes to it with red or blue chocolate/icing.

And of course, you can't celebrate a totally American holiday without Apple Pie! We made a post called "Mini Apple Pies" which explain exactly what you would need for this yummy American treat!

If you are looking for an even easier way to get the red white and blue theme, serve licorice, yogurt covered pretzels and blueberries. Or any other colored treats! Those were just some quick and easy ways to make your BBQ or 4th party a little more 4th themed :) Hope this helped you get in the spirit!
Sunday, June 29, 2014
Chocolate Chip Cookie Balls
While us SoFlo girls were off exploring the Mediterranean, my boyfriend Charlie rolled his ankle during a basketball game and possibly broke it :o Obviously, he was pretty upset after so I decided to make him smile by making a "broken ankle blues" kit with some of his favorite treats, which includes some of my freshly baked gooooods! So, with the help of one of my bestest friends Janie, we found the perfect recipe for some Chocolate Chip Cookie Balls from Sally's Baking Addiction. Just a little moment to chit-chat about the amazing Sally: her website is a little piece of sprinkled "fun and adventure" and her recipes are tooo dieee forrrr! She even has a cookbook, one of my dreamssss! So before I go all girl-crush on Ms. Sally and take up this whole post talking about her... Check out her website! Right Here :) I couldn't not share this yummy recipe with you! So without further adeau here is the worlds most delicious chocolate chip cookie ballllssss.
Ingredients
3/4 cup unsalted butter, softened to room temperature
3/4 cup dark brown sugar
1/4 cup granulated sugar
1 large egg, at room temperature
2 teaspoons vanilla extract
2 cups all-purpose flour
2 teaspoons cornstarch
1 teaspoon baking soda
1/2 teaspoon salt
1 and 1/4 cup semi-sweet chocolate chips
Directions
1. Beat the butter in a large mixing bowl for 1 minute on medium speed until completely smooth and creamy. Add in the brown sugar and granulated sugar and mix on medium speed. Next mix in the egg and vanilla, making sure to scrape down the sides and bottom of the bowl. In a separate bowl combine the rest of the dry ingredients and then on a low speed mix into the wet ingredients. The dough should be pretty thick! Add in the chocolate chips and continue mixing the dough {I went overboard on the chocolate chips. True Life Im A Choco-holic}. Cover the dough for with tin foil and allow to chill.


2. Remove the cookie dough from the fridge and allow to cool to room temperature. Pre-heat the oven to 350F. Line a baking sheet with parchment paper and set aside

3. The dough, once chilled, will be a little crumbly but once you work the dough it will come together. Roll the dough into little individual balls and set onto the baking sheet {if you want cookies don't make the balls so high and allow room to spread, if you want little balls make the balls higher and you can fit more on a baking sheet} Bake for 6-9 minutes depending on how doughy you want them.

4. EAT THEM ALL!
and there ya go some delicious little chocolate chip cookie balls! so delicious :)
Sunday, June 22, 2014
sweet summertime
Some highlights from our Mediterranean Cruise for mummies birthday. Lots of posts to come with FOOD, shopping, vino, and bunches of more {f}un.... enjoy!


Subscribe to:
Comments (Atom)